Now that it’s properly winter, it’s ice climbing season! Here’s a list of gear to pack every time you go out, to ensure your safety and comfort in the outdoors. This is a living document that I’ll keep updating with product recommendations, photos, and tips, so reach out if you have suggestions or questions!
If you’re going out with a guide (like me!) you probably only need to worry about your clothing and sustenance! Most guide services (BaseCamp Ouray outings include free rentals) will hook you up with everything climbing-specific that you need, like all your technical gear, and even a backpack, parka and gloves, but make sure to ask when you book.
Overview
Before you go: trip planning
Typical outdoor precautions apply! Have you trip planned adequately? This could be a whole separate post, so I’ll just mention these topics here briefly, as a reminder, to keep the packing list more concise.
Weather and avalanche forecast
Weather of course impacts your packing substantially. Keep in mind the temperature, wind, and sun/shade of your destination as you pack.
Avalanche hazards are something to consider every time we recreate in the snow. As opposed to skiers, unfortunately when we are ice climbing, we’re often below an avalanche shoot, and can’t assess the avalanche terrain from which we’re at risk. Look up the avy forecast for your area the day before and morning of your climb, and consider bringing avalanche gear (beacon, shovel, probe), and the avalanche rescue training level of your climbing partners.
Emergency plan: tell someone where you’re going
This is more applicable the farther remote you’re going. Going to G1 in Hyalite, or the Ouray Ice Park, places with cell service and plenty of people, I don’t find this necessary but going into the backcountry I always make sure someone knows where I was headed and what time I expect to be out. If this seems tedious, you can think of it not being for you, but for the people who would worry about you.
Clothing
Top
It’s essential to keep your core warm! At the beginning of the season, I always opt for more layers than I think are necessary, as my body readjusts to being in the cold.
Base Layer
Some people will skip a wool base layer on warmer days and instead opt for something breathable like a sun hoody, or synthetic shirt. Mainly, we don’t want to wear cotton.
Personally, I’ll be freezing if I don’t have a good base layer that’s tight to my skin. Usually this is a tight-fitting wool tank top, that I then layer under a sun hoody or a long-sleeve wool shirt.
Soft shell
The compromise between wind- /water-resistance and breathability.
Mid-layer(s)
This could be a fleece that goes under your softshell, or a lighter insulated jacket that goes over your soft shell and fits underneath your hardshell jacket and/or big insulated jacket.
Waterproof layer
A hardshell jacket / rain jacket. I usually leave this one in the bottom of the bag, but sometimes we climb ice that’s so drippy that we need a raincoat! This should be sized big enough that you can fit it over the layers described above, and be able to raise your arms over your head, while keeping your core covered.
Parka
The big jacket. This is one that should fit over all your other layers. This is for staying warm while you’re standing still, and most often when you climb, you’ll either leave it at the base, or stash it in your multi-pitch backpack while you’re climbing a pitch and then put it on again while you’re waiting at the belay.
Bottom
Base layer
Depending on personal warmth and weather, it’s not always necessary to wear a base layer underneath your main climbing pants, but I typically wear a thin synthetic or wool layer. Think SmartWool, Icebreaker, Kari Traa, etc.
Climbing pants
A softshell or thicker pant
[Optional] Gaiters
If your pants are baggy (like ski pants), or you just want to protect your nice softshell pants from accidental crampon tears, you can wear a gaiter. This also helps with warmth in your legs and feet, but can make it annoying to adjust your boots.
Waterproof pants
This helps keeping warm from wind and primarily keeps you dry if you end up climbing something drippy! It’s essential for your warmth to stay as dry as possible. I highly recommend full-zip pants, or at least partial-size-zip pants where you can get them on and off without having to remove your boots and/or crampons. The benefit of full-zip pants is they can go on/off without having to remove your harness.
Insulated pants
I only bring these if it’s very cold, but they can be an absolute game changer, especially in a single-pitch environment where you’re hanging out at the base of the climbs next to your backpack, waiting to climb.
Accessories
Glasses
I recommend wearing glasses when you ice climb, to protect your eyes from little (or not-so-little) chunks of ice flying out from your swinging tools. If it’s sunny, then this can just be sunglasses. But in lower light settings, you might find that to be too dark. I have a pair of transition glasses that I usually wear (which is great for low-light conditions as well as sun), but otherwise, as a get-the-job-done budget option: you can look for a cheap pair of hardware store glasses, or light-shaded gas station glasses.
Hats
A big consideration with a hat is if it will fit under your helmet. I have a thin hat I bring when it’s cold for under my helmet, and I have a thicker one that I’ll wear on the approach if it’s quite cold.
A sun hat can also be useful to reduce the sun in your eyes and on your face.
Neck gaiters
I find this to be an essential piece for staying warm. I always wear a thin, synthetic one, but I’ll pull out a thick fleece neck gaiter for colder days.
Gloves
I bring a few different pairs of gloves.
- a thinner glove for hiking in and climbing in warmer weather
- a big glove just for warmth
- a fully waterproof fishing glove in case I’m climbing wet ice and need to keep my hands dry
If your hands are getting cold (or you’re worried about having cold hands) a great trick is to tape a hand-warmer to the inside of your wrist! It warms up the blood on its way to your hand and can make a big difference. You can also just keep some hand-warmers in your pockets to warm up your hands while you’re standing around.
Socks
Counter-intuitively, thicker socks do not necessarily mean warmer feet. While it can be tempting to wear giant fuzzy socks to keep our toes warm, if these socks don’t fit in the boots, and instead reduce the circulation to your toes, you’ll be colder than if you had worn thinner socks. I have warm boots, so I wear thin ski socks, and adjust the tightness of my boot to balance climbing performance with toe-circulation and comfort.
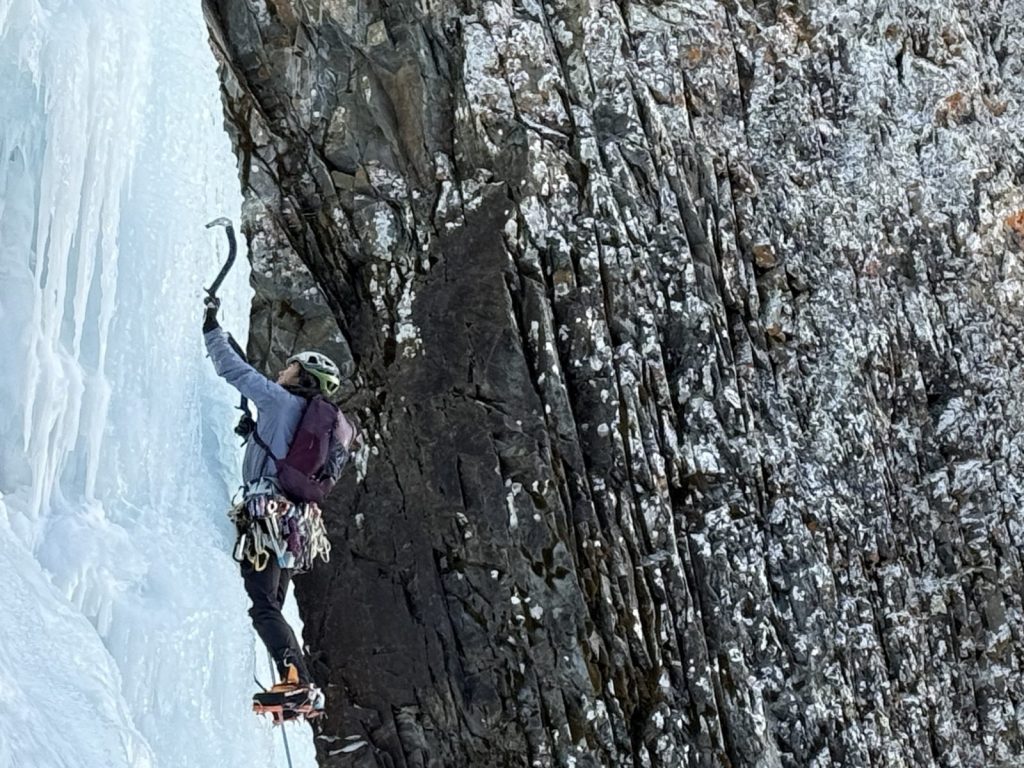
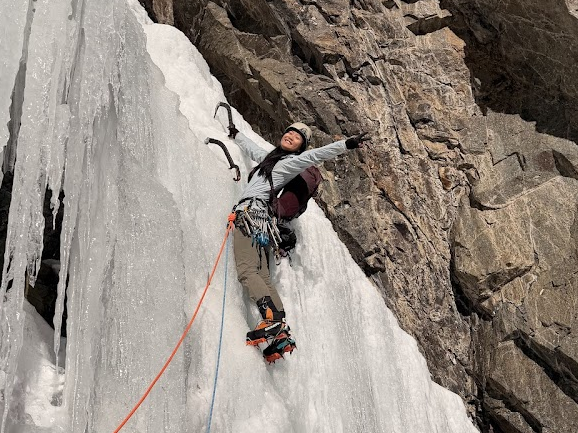
Technical Gear
Personal gear is stuff that every person needs to have, and group gear is what you can coordinate with your climbing partners to bring for the group.
Personal gear
If you’re climbing with a guiding service, all this gear should be available as rentals.
Boots
Full-shank boots are highly recommended. This means they have both a toe-shank and a heel-shank, to accept fully-automatic crampons.
Crampons
There are a few different types of crampons, but we’re looking for ones that are for ice or technical climbing, as opposed to for mountaineering. The front-points on ice climbing crampons are narrower and sharper and go into the ice better. Make sure to fit them to your boots before you go out.
Harness
Keep in mind the harness needs to fit over your winter-base layers. Unlike a rock harness, where all the padding is super nice, you can get away with a slightly less padded harness for ice climbing, as usually we’re wearing a lot of layers, which provides adequate padding.
Ice clippers
These are for racking ice screws. Ice-specific harnesses will have loops to put the ice clippers. These are nearly essential if you’re cleaning screws (for multi-pitch ice climbing) or leading.
Helmet
Always. No helmet is a no-go for ice, much more so than for rock, due to the increased likelihood of small-to-medium icefall.
Ice tools and/or dry tools
For single-pitch ice climbing, it’s possible to share tools, so not everyone needs their own pair of ice tools! For multi-pitch climbing, it’s necessary to have your own. I recommend renting/borrowing tools to start, to get a feel for what type of tool you like best, before purchasing your own.
Avalanche gear: beacon, shovel, prove
This very well may not be applicable for your day (i.e. in the Ouray Ice Park!), but you should think about if you should bring it, for every climb. Make sure your beacon has enough battery before you leave.
Group gear
If you’re climbing with a guide, all this gear will be provided.
Rope
A dry rope is nearly essential for ice climbing, as a non-dry rope will tend to freeze, which can mean your top-rope can get stuck (frozen) up at the anchor, or become stiff and unwieldly for tying knots or feeding through a belay device (or even slip in the device).
Screws and draws
Ice screws and a way to connect them to the rope! Even if you’re just setting up top-ropes from above, it’s good to bring a couple screws, in case you want to make a ground anchor, or set a directional for your climb. For leading multi-pitch ice routes, be sure to include enough screws for two screw anchors in addition to screws to lead a pitch of ice. Additionally, I always bring one long screw for V-threading and a v-thread tool (see next section!)
I bring a mix of quick-draws and alpine draws. I prefer clipping the quick-draws, but sometimes I want to be able to extend the draw, or use it in an anchor situation.
V-Thread tool
This can either always live on the back of your harness, or with your longest ice screw.
Anchor Materials
Usually, some nonlocking carabiners for the screws/bolts, a long sling (triple or quad) or cordalette, and 2 locking carabiners for the rope to run through. In the Ouray Ice Park, or other places where you think you may be top-roping off an anchor set far back from the cliff, you can bring a short static line.
Belay devices
Gri-gri’s can slip on wet or icy ropes, so devices like the Mamut Smart, Black Diamond Pilot, or Edelrid Jul (Nano, Mega, or Giga size) work better.
Safety/Back-ups
First-aid
We’re climbing a hard surface with knives attached to our feet. I make sure I have what I need to stop bleeding fast (torniquet, hemostatic gauze, regular gauze). Otherwise, standard first aid kit commercially available like this Adventure Medical 0.7 Kit.
In-reach / Satellite messenger
While satellite messaging on iPhones has gotten quite good, I still don’t trust my life to it. If you’re going to be out of cell service, you need to have a plan for how to call for help without your cell phone. For me, that’s my Garmin InReach.
Headlamp
Always in same pocket of my backpack, even if I don’t think I’m going to be out that long. And hey, sometimes we start early enough in the morning to need one, too.
Radio
Not as necessary for single pitch climbing, but I find these almost essential for multi-pitch climbing. Ideally, I have my multi-pitch systems practiced and understood between myself and my partner(s), so we don’t need the radios if everything goes according to plan, but if there’s confusion or emergency, I find it extremely helpful to be able to communicate. It generally just makes the day smoother, and is worth the small amount of extra weight.
For 20% off Rocky Talkie radios, you can become a Ouray Ice Park member 😉
Bail kit
Items to leave behind if you can’t rappel off of a fixed anchor nor do a zero-thread. This kit consists of:
- a quick-link, rap ring, or carabiner you don’t mind leaving behind.
- 20 feet or so of webbing or 6+mm nylon cord
- a knife to cut the cord/webbing: often v-thread tools will have a knife, as well, but I like having a dedicated knife in case I need to cut things like tape, bandages, or even clothing.
- a lighter (this one is slightly optional, but when I cut cord that I’m going to leave around a tree, I like to burn the ends to prevent fraying)
Repair/tool kit
I keep all this with my bail kit, in a little stuff-sack that bounces from backpack to backpack.
- Allan wrenches to tighten the various bolts on crampons and ice tools
- an extra toe bale
- an extra pick (whether or not you want to carry this extra weight depends on the length of your route and how consequential it would be if a pick on your ice tool breaks)
- ski strap (this lives on my pole)
- tape (duct tape, cloth tape, etc.)
- a zip-lock bag (you never know when you need to pack out trash or keep something contained)
Sustenance & Personal Items
Warm drink
This one is super essential in all but the warmest of temps. Get a really good thermos, and fill it with anything hot: tea, coffee, plain hot water, miso soup, etc.
Hydration
I like to bring at least a little bit of water. I like electrolyte water, since I hardly want to drink cold water while I’m out in the cold, so it’s great that it can be extra hydrating.
Food
I like to bring lots of fatty foods for winter climbing. I like to bring a lunch, like a sandwich wrapped in foil, or even hot food in a thermos. Some good snacks include: cheese, peanut butter, nuts, etc. Being out in the cold takes an unexpected amount of energy, and it’s harder to stay warm if you’re hungry.
Sun protection
Sunscreen, sunglasses, sun cap (optional). Though it seems counter-intuitive, as usually we’re worried about the cold, the sun can still burn, and it can be quite reflective off the snow and ice. Make sure your sunglasses fit comfortably while wearing your helmet. I like bringing sunscreen in a stick-format, so then I can apply it to my face without taking my gloves off. You shouldn’t need much of it, as usually just your face is exposed.
Personal hygiene
Any personal medications, or bathroom items like a wag bag, TP (and a way to pack it out!) a pee rag like a Kula Cloth, a pee funnel, etc.
Carrying strategy
Big backpack
A backpack to carry all your supplies to the base of your climb. 35L – 45L is a great size. It’s nice to have a bag that’s comfy, that can easily hold all your belongings (there are lots of big layers to carry during the winter!)
Multi-pitch backpack [if applicable]
A little 15-25L pack is incredibly useful to carry your extra layers up the climb. A big consideration on choosing a multi-pitch ice bag, is if it can fit your avalanche shovel and probe, in case you need to climb with avalanche gear.
Car bag
This is something I started doing recently. I bring a separate bag full of stuff that I just want to have in the car. It’s nice to have access to things during the drive in, so I don’t have to unpack/repack them out of my main backpack, and it feels nearly luxurious to come back to the car to fresh supplies (this is more useful for multi-day trips but still feels lovely at the end of a long day). It usually includes
- car water bottle
- hot drink for the drive if it’s a long drive
- car snacks
- comfy shoes (if I’m not already wearing them!)
- avalanche gear if we’re on the fence about bringing it along
Extras
Extra little things that will make you comfy for your day out. Especially if you’re cragging and/or have a short approach, it’s worth a little extra weight so you can be comfortable all day. What extra comfort items do you like to bring?
sit pad / foam pad
If I want to be extra comfy in the outdoors, I’ll bring a sit pad / foam pad, so I can have something insulated to sit on (super helpful in the snowy environment when you get really cold if you sit on the ground!). For ice park days, I’ll often bring my z-lite sleeping pad.
Have fun!
I hope this list helps you prepare for your next ice climbing trip. Cheers!
Subscribe
Follow my blog to have new posts delivered to your inbox.

Leave a comment